本文记录了如何在Proxmox VE (基于6.x版本/更新7.x版本)中开启硬件GPU直通,并创建Ubuntu虚拟机加载的过程。
更新2023-04-11:基于PVE7版本设置
根据best_guide_for_gpu_passthrough_for_promox_72,需要在/etc/default/grub设置,由PVE6版本的
GRUB_CMDLINE_LINUX_DEFAULT="quiet amd_iommu=on iommu=pt pcie_acs_override=downstream video=efifb:off,vesafb:off"
更新为PVE7版本
GRUB_CMDLINE_LINUX_DEFAULT="quiet amd_iommu=on iommu=pt pcie_acs_override=downstream video=efifb:off video=vesafb:off video=simplefb:off
才能生效。同时根据具体的GPU型号选择是由BIOS还是UEFI配置启动虚机,之后可以在虚机中成功配置直通GPU:
 ~ nvidia-smi
Mon Apr 10 23:11:26 2023
+-----------------------------------------------------------------------------+
| NVIDIA-SMI 515.105.01   Driver Version: 515.105.01   CUDA Version: 11.7     |
|-------------------------------+----------------------+----------------------+
| GPU  Name        Persistence-M| Bus-Id        Disp.A | Volatile Uncorr. ECC |
| Fan  Temp  Perf  Pwr:Usage/Cap|         Memory-Usage | GPU-Util  Compute M. |
|                               |                      |               MIG M. |
|===============================+======================+======================|
|   0  NVIDIA GeForce ...  Off  | 00000000:01:00.0 Off |                  N/A |
|  0%   31C    P8     6W / 185W |      5MiB /  8192MiB |      0%      Default |
|                               |                      |                  N/A |
+-------------------------------+----------------------+----------------------+

+-----------------------------------------------------------------------------+
| Processes:                                                                  |
|  GPU   GI   CI        PID   Type   Process name                  GPU Memory |
|        ID   ID                                                   Usage      |
|=============================================================================|
|    0   N/A  N/A       982      G   /usr/lib/xorg/Xorg                  4MiB |
+-----------------------------------------------------------------------------+
1. 开启iommu
- 首先需要在主板bios/uefi cpu选项中开启IO直通:
Intel VT-d/AMD-V - PVE host中修改启动参数1:
编辑/etc/default/grub:
找到:GRUB_CMDLINE_LINUX_DEFAULT=”quiet”
替换为GRUB_CMDLINE_LINUX_DEFAULT=”quiet intel_iommu=on video=efifb:off,vesafb:off”
如果是amd平台替换为GRUB_CMDLINE_LINUX_DEFAULT=”quiet amd_iommu=on video=efifb:off,vesafb:off”
解释:
iommu开启直通分组
efifb:off 禁用efi启动的显示设备
vesafb:off 禁用legacy启动的显示设备“quiet amd_iommu=on iommu=pt”
关于pt模式的解释2:
PT Mode
Both Intel and AMD chips can use the additional parameter “iommu=pt”, added in the same way as above.
This enables the IOMMU translation only when necessary, and can thus improve performance for PCIe devices not used in VMs.
替换后执行以下命令更新grub:
$ update-grub
1.1 确认IOMMU开启成功
- 重启后,执行以下命令,如看到类似输出结果,IOMMU开启成功。
# dmesg | grep -e DMAR -e IOMMU
[    0.793377] pci 0000:00:00.2: AMD-Vi: IOMMU performance counters supported
[    0.793438] pci 0000:40:00.2: AMD-Vi: IOMMU performance counters supported
[    0.795666] pci 0000:00:00.2: AMD-Vi: Found IOMMU cap 0x40
[    0.795669] pci 0000:40:00.2: AMD-Vi: Found IOMMU cap 0x40
[    0.796721] perf/amd_iommu: Detected AMD IOMMU #0 (2 banks, 4 counters/bank).
[    0.796758] perf/amd_iommu: Detected AMD IOMMU #1 (2 banks, 4 counters/bank).
- 确认IOMMU Interrupt Remapping可以重映射
# dmesg | grep 'remapping'
[    0.822375] AMD-Vi: Interrupt remapping enabled
- 确认IOMMU Isolation
# find /sys/kernel/iommu_groups/ -type l
/sys/kernel/iommu_groups/17/devices/0000:09:00.3
/sys/kernel/iommu_groups/35/devices/0000:43:00.3
/sys/kernel/iommu_groups/7/devices/0000:00:07.1
/sys/kernel/iommu_groups/25/devices/0000:40:03.1
/sys/kernel/iommu_groups/15/devices/0000:09:00.0
...
2. 加载模块
编辑/etc/modules,添加以下模块:
vfio
vfio_iommu_type1
vfio_pci
vfio_virqfd
添加后执行命令以下更新3:
# update-initramfs -u
update-initramfs: Generating /boot/initrd.img-5.4.119-1-pve
Running hook script 'zz-proxmox-boot'..
Re-executing '/etc/kernel/postinst.d/zz-proxmox-boot' in new private mount namespace..
No /etc/kernel/proxmox-boot-uuids found, skipping ESP sync.
确认加载成功2:
use lspci -v to check that the NVidia card is now using the vfio-pci instead of any NVidia driver as can be seen in my example above.
#  lspci -v
...
42:00.0 VGA compatible controller: NVIDIA Corporation TU106 (prog-if 00 [VGA controller])
  ...
    Kernel driver in use: vfio-pci
    Kernel modules: nvidiafb, nouveau
3. 阻止PVE加载GPU驱动
因为pve启动时会尝试加载显卡驱动,为了避免pve占用显卡,需要阻止pve的显卡驱动加载。
3.1 添加驱动黑名单
编辑/etc/modprobe.d/pve-blacklist.conf,添加以下内容:
# block AMD driver
blacklist radeon
blacklist amdgpu
# block NVIDIA driver
blacklist nouveau
blacklist nvidia
blacklist nvidiafb
# block INTEL driver
blacklist snd_hda_intel
blacklist snd_hda_codec_hdmi
blacklist i915
3.2 添加GPU到直通设备
查看所有pci设备,找到需要直通的GPU:
# lspci | grep NVIDIA
42:00.0 VGA compatible controller: NVIDIA Corporation TU106 (rev a1)
42:00.1 Audio device: NVIDIA Corporation TU106 High Definition Audio Controller (rev a1)
42:00.2 USB controller: NVIDIA Corporation TU106 USB 3.1 Host Controller (rev a1)
42:00.3 Serial bus controller [0c80]: NVIDIA Corporation TU106 USB Type-C Port Policy Controller (rev a1)
并找到对应gpu硬件id,形式xxxx:xxxx:
# lspci -n -s 42:00
42:00.0 0300: 10de:1f07 (rev a1)
42:00.1 0403: 10de:10f9 (rev a1)
42:00.2 0c03: 10de:1ada (rev a1)
42:00.3 0c80: 10de:1adb (rev a1)
添加对应硬件id到vfio.conf,编辑/etc/modprobe.d/vfio.conf:
options vfio-pci ids=10de:1f07,10de:10f9,10de:1ada,10de:1adb
之后重启PVE host。
4. 加载虚机
如果是nvidia GPU,可以额外配置2:
echo "options kvm ignore_msrs=1" > /etc/modprobe.d/kvm.conf
创建虚拟机需要判断显卡是否支持UEFI(OVMF)兼容:
# cd /sys/bus/pci/devices/0000\:42\:00.0
# echo 1 > rom
# cat rom > /tmp/image.rom
# echo 0 > rom
# ./rom-parser /tmp/image.rom
Valid ROM signature found @0h, PCIR offset 170h
    PCIR: type 0 (x86 PC-AT), vendor: 10de, device: 1f07, class: 030000
    PCIR: revision 0, vendor revision: 1
Error, ran off the end
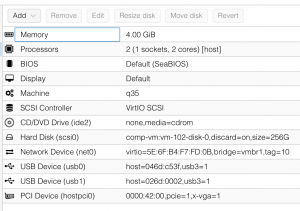
测试后该GPU并不支持使用UEFI,所以使用传统的bios创建虚机,创建Ubuntu虚拟机配置如下:

其中添加GPU直通配置如下:

根据以上配置创建虚拟机并直通GPU成功,之后可以在虚拟内安装相应GPU驱动。